GPT-4 API access has arrived, let the games begin.
In this guide, we're going to look at how we can turn any website into an AI assistant using GPT-4, OpenAI's Embeddings API, and Pinecone. To do so, the steps I'm going to take include:
- Scraping my own site MLQ.ai
- Convert the text from each article into embeddings using the OpenAI API
- Store these embeddings at a vector database: Pinecone
- Use GPT-4 to query the site, answer with context, and return relevant sources
This fits well into my previous articles on building a GPT-enabled research assistant and demonstrates how we can combine GPT-4 and semantic search to create a powerful AI assistant that leverages custom knowledge bases.
For this tutorial, I've adapted the code from a few other relevant resources, including OpenAI Web Crawl Q&A Cookbook and this GPT-4 LangChain & Pinecone tutorial.
Also, you can access the premium video tutorial for this post here:

Step 0: Installs & imports
First off, we need to install the following libraries into our Colab notebook:
!pip install tiktoken openai pinecone-client -q
Next, we'll import to the following libraries, which are used to scrape web pages, extract links, compute and store the embeddings of each page, and so on. We'll also set our OpenAI API key and Pinecone API key and environment key:
import openai
import tiktoken
import pincone
import os
import re
import requests
import urllib.request
from bs4 import BeautifulSoup
from collections import deque
from html.parser import HTMLParser
from urllib.parse import urlparse
from IPython.display import Markdown


openai.api_key = "YOUR-API-KEY"

PINECONE_API_KEY = 'YOUR-PINECONE-KEY'
PINECONE_API_ENV = 'YOUR-PINECONE-ENV'
Step 1: Crawl website
Next up, let's go and crawl each page of my website and extract the text. To do so, I've simply used the code from this OpenAI Cookbook.
I won't go through the details of scraping in this tutorial, although at a high-level, a few of the key functions and parameters we need to set include:
- A regex pattern to match the website URL
- We need to set the root domain and the starting URL to crawl
- A function to retrieve the hyperlinks from a given URL by opening the URL, reading the HTML, and parsing it with the
HyperlinkParserclass crawl(url)is the main function that does the scraping, which uses BeautifulSoupe to extract the text from each page, save it to a file, and add new links to the queue until the whole root domain has been crawled
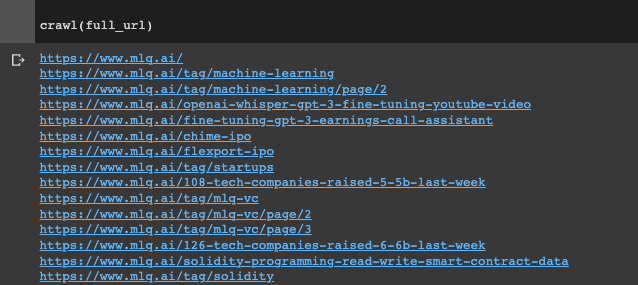
So far so good.
Step 2: Data preparation
Now that we've crawled the site and extracted text from each page, we need to prepare our data for the OpenAI Embeddings API.
We first need a function to remove the newlines, double spaces, and other whitespace characters from each row in our text:
def remove_newlines(serie):
    serie = serie.str.replace('\n', ' ')
    serie = serie.str.replace('\\n', ' ')
    serie = serie.str.replace('  ', ' ')
    serie = serie.str.replace('  ', ' ')
    return serie
Create a DataFrame with the text, filename, & URL
After defining this function, we're going to create a DataFrame with our extracted text, the filename (i.e. section title), and the associated URL.
Here's an overview of how we do that:
- First, we need to create an empty list
textsto store the text files. - We'll then loop through each file in the
textdirectory in our notebook and read the text into memory. - We're then going to extract the original URL from the filename so we can return the source later and append the text, filename, and URL to the
textslists - Finally, we'll set the text column to the raw text and save the processed data to a CSV file called
scraped.csv
# Create a list to store the text files
texts=[]

# Get all the text files in the text directory
for file in os.listdir("/content/text/" + domain + "/"):

    # Open the file and read the text
    with open("text/" + domain + "/" + file, "r") as f:
        text = f.read()

        # Extract the original URL from the filename
        original_url = "https://" + file[:-4].replace("_", "/")

        texts.append((file[11:-4].replace('-',' ').replace('_', ' ').replace('#update',''), text, original_url))

# Create a dataframe from the list of texts
df = pd.DataFrame(texts, columns = ['fname', 'text', 'url'])

# Set the text column to be the raw text with the newlines removed
df['text'] = df.fname + ". " + remove_newlines(df.text)
df.to_csv('/content/processed/scraped.csv')
df.head()
Tokenizing the Text
Next up, let's tokenize each row of the text and save the number of tokens to a new column in our DataFrame with the tokenizer.encode() method from OpenAI''s TikToken library.
Let's also plot a histogram to visualize the distribution of tokens in our DataFrame:
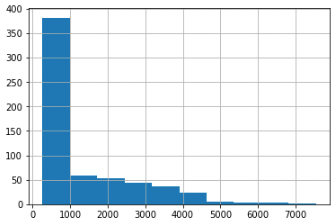
As we can see, there are a few rows of 5k+ tokens which will cause token limit issues (at least until the GPT-4 32k token limit rolls out), so let's now split our text into subsections of smaller chunks.
Splitting the text into smaller chunks
There are a few ways we can do this, for example, we could use LangChains Text Splitter, although in this case I've just used the split_into_many function from OpenAI's notebook:
- This function takes in two inputs
textandmax_tokensand splits the text into a maximum value of 500 tokens - It then calculates the number of tokens for each sentence with the
tokenizer.encodefunction - We then use this function to split the text of each row in the DataFrame into chunks if the number of tokens is greater than the maximum number of token
- Finally, we store this shortened text as our new
df
shortened = []

# Loop through the dataframe
for row in df.iterrows():

    # If the text is None, go to the next row
    if row[1]['text'] is None:
        continue

    # If the number of tokens is greater than the max number of tokens, split the text into chunks
    if row[1]['n_tokens'] > max_tokens:
        text_chunks = split_into_many(row[1]['text'])
        shortened.extend([{'title': row[1]['title'], 'text': chunk, 'url': row[1]['url']} for chunk in text_chunks])

    # Otherwise, add the text, title, and url to the list of shortened texts
    else:
        shortened.append({'title': row[1]['title'], 'text': row[1]['text'], 'url': row[1]['url']})

df = pd.DataFrame(shortened, columns = ['title','text', 'url'])
df['n_tokens'] = df.text.apply(lambda x: len(tokenizer.encode(x)))

Alright, we now have our data in the right format, let's go and compute the embeddings of each row.
Step 3: Compute embeddings
We've covered this before, but in case you're new to machine learning, as OpenAI highlights:
...text embeddings measure the relatedness of text strings. Embeddings are commonly used for search, clustering, recommendations, anomaly detection, diversity measurement, and classification.
To compute these embeddings, we'll use the latest embedding (at the time of writing) text-embedding-ada-002:
df['embeddings'] = df.text.apply(lambda x: openai.Embedding.create(input=x, engine='text-embedding-ada-002')['data'][0]['embedding'])

Step 4: Storing the embeddings at Pinecone
Now that we've computed the embeddings for the text of each page, I want to store them at a vector database so that I can re-use them later and be able to efficiently query them with semantic search.
In case you're unfamiliar, here's how Pinecone defines vector databases and their use case:
Complex data is growing at break-neck speed...Many organizations would benefit from storing and analyzing complex data, but complex data can be difficult for traditional databases built with structured data in mind.
Vector embeddings describe complex data objects as numeric values in hundreds or thousands of different dimensions.
Vector databases are purpose-built to handle the unique structure of vector embeddings. They index vectors for easy search and retrieval by comparing values and finding those that are most similar to one another.
Before sending the embeddings to Pinecone, we just need to:
- Create an 'id' column filled with UUIDs for Pinecone to index and search vectors in the database
- Fill any null values in the title column as this was causing an error:
# Add an 'id' column to the DataFrame
from uuid import uuid4
df['id'] = [str(uuid4()) for _ in range(len(df))]

# Fill null values in 'title' column with 'No Title'
df['title'] = df['title'].fillna('No Title')
Next, since we've got the embeddings computed we can just follow these steps to upsert them to the index of our choosing:
- Define the index name
- Initialize Pinecone with a new index or connect to an existing one
- Set a
batch_sizeof 100, i.e. process and insert embeddings in batches of 100 - Convert the DataFrame to a list of dictionaries called
chunks - Upsert the embeddings into our vector database
# Define index name
index_name = 'mlqassistant'

# Initialize connection to Pinecone
pinecone.init(api_key=PINECONE_API_KEY, environment=PINECONE_API_ENV)

# Check if index already exists, create it if it doesn't
if index_name not in pinecone.list_indexes():
    pinecone.create_index(index_name, dimension=1536, metric='dotproduct')

# Connect to the index and view index stats
index = pinecone.Index(index_name)
index.describe_index_stats()

from tqdm.auto import tqdm

batch_size = 100  # how many embeddings we create and insert at once

# Convert the DataFrame to a list of dictionaries
chunks = df.to_dict(orient='records')

# Upsert embeddings into Pinecone in batches of 100
for i in tqdm(range(0, len(chunks), batch_size)):
    i_end = min(len(chunks), i+batch_size)
    meta_batch = chunks[i:i_end]
    ids_batch = [x['id'] for x in meta_batch]
    embeds = [x['embeddings'] for x in meta_batch]
    meta_batch = [{
        'title': x['title'],
        'text': x['text'],
        'url': x['url']
    } for x in meta_batch]
    to_upsert = list(zip(ids_batch, embeds, meta_batch))
    index.upsert(vectors=to_upsert)

Now if we check out the stats of our new vector database we can see we've got a count of 1557 vectors in there, which is the length of of DataFrame. Success.
Step 5: Ask questions with GPT-4
Last but certainly not least, let's use GPT-4 and the ChatCompletion class from OpenAI to ask questions about the site and retrieve relevant sources.
The steps we need to take to do this include:
- Get the query embeddings
- Retrieve relevant context from Pinecone including the question
- The resulting
responseobject contains a list of the relevant matches, each with metadata with the title, text, and source URLs - In this case, we're retrieving the top 5 matches with the
top_kparameter:
embed_model = "text-embedding-ada-002"
user_input = "What is deep q learning?"

embed_query = openai.Embedding.create(
    input=user_input,
    engine=embed_model
)

# retrieve from Pinecone
query_embeds = embed_query['data'][0]['embedding']

# get relevant contexts (including the questions)
response = index.query(query_embeds, top_k=5, include_metadata=True)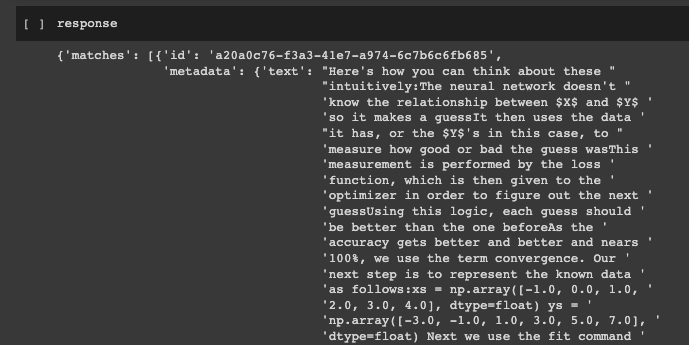
Create Augmented Query with Context
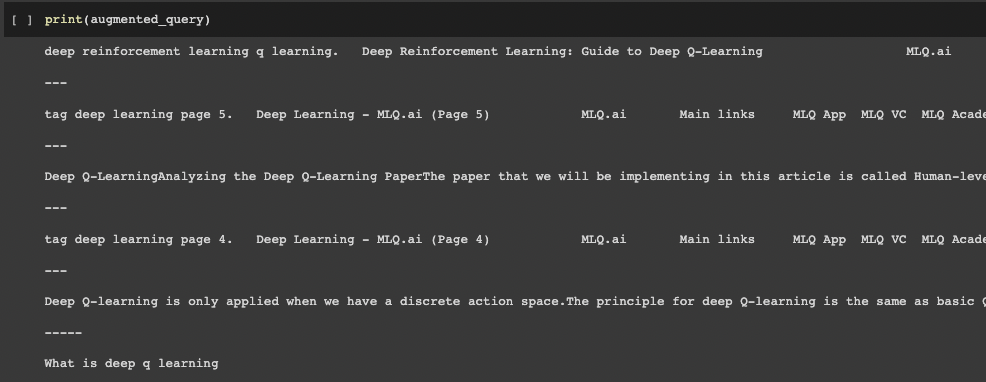
Next up, let's go an augment our query by combining both the retrieved context and the original query:
contexts = [item['metadata']['text'] for item in response['matches']]

augmented_query = "\n\n---\n\n".join(contexts)+"\n\n-----\n\n"+query
Initialize Conversation with GPT-4
Next up, we need to create our GPT-4 API call with augmented query, to do this we:
- Set the system message to assign a "role" to GPT-4, in this case I've told it it's a helpful machine learning assistant and tutor
- We then add both the system role and assign the "user" role to our
augmented_queryin the themessagesparameter
# system message to assign role the model
system_msg = f"""You are a helpul machine learning assistant and tutor. Answer questions based on the context provided, or say I don't know.".
"""

chat = openai.ChatCompletion.create(
    model="gpt-4",
    messages=[
        {"role": "system", "content": system_msg},
        {"role": "user", "content": augmented_query}
    ]
)
We can test this out with a single-shot conversion as follows:
display(Markdown(chat['choices'][0]['message']['content']))
Not bad, GPT-4.
Creating a conversation loop with GPT-4
The last thing we need to do is add a conversation loop so we can ask follow-up questions with memory.
We also want to display the sources of relevant context.
First up, we can display the sources of the context used to answer the question by accessing the metadata in our matches as follows:
def display_with_sources(response_content, matches):
    response = f"{response_content}\n\nSources:\n"
    for match in matches:
        title = match['metadata']['title'].title()
        url = match['metadata']['url']
        response += f"- [{title}]({url})\n"
    display(Markdown(response))
Finally, we can put everything together create a conversation loop in Colab with a while loop to retreive relevant context, augment our query, pass that to GPT-4, keep track of the responses in the assistant role:
while True:
    user_message = input("You: ")

    if user_message.lower() == "quit":
        break

    # Perform the search based on the user's query and retrieve the relevant sources
    embed_query = openai.Embedding.create(
        input=[user_message],
        engine=embed_model
    )

    # retrieve from Pinecone
    query_embeds = embed_query['data'][0]['embedding']

    # get relevant contexts (including the questions)
    response = index.query(query_embeds, top_k=5, include_metadata=True)
    matches = response['matches']

    # get list of retrieved text
    contexts = [item['metadata']['text'] for item in response['matches']]

    # concatenate contexts and user message to generate augmented query
    augmented_query = " --- ".join(contexts) + " --- " + user_message

    messages.append({"role": "user", "content": augmented_query})

    chat = openai.ChatCompletion.create(
        model="gpt-4",
        messages=messages
    )

    assistant_message = chat['choices'][0]['message']['content']
    messages.append({"role": "assistant", "content": assistant_message})

    display_with_sources(assistant_message, matches)
Looking good.
Summary: Turning my website into an AI assistant with GPT-4 and Pinecone
In this guide, we saw how we can augment the new GPT-4 API with a separate body of knowledge in order to create a custom AI assistant. Specifically, we saw how we can scrape a website, compute the embeddings, store them at Pinecone,a nd use GPT-4 to create a chatbot with relevant context.
The next step will be to take this out of Colab notebook and into production...but we'll save that for another article.
Resources


